How to Host Your Own Blog/Website for $0.50/month

The Challenge of Writing on Medium
As a reader, I love Medium. It is my go-to source for keeping up with new technologies and new ideas. For $5/month it's worth every penny.
As a writer, I am not quite as enthusiastic. Why? Because Medium's lack of transparency is maddening. I have no idea how many impressions my headlines get, or if my stories get any sort of visibility at all. Are my stories not getting views because they're not interesting, or not topical, or because no one sees them? It is hard to figure out what to do to find an audience.
I've read lots of articles on this topic - it's a popular one. Publish consistently. Write for publications. Target your articles for Search, and so on. Like most writers on Medium, I'm not doing it for the money, but shouting into the wilderness isn't much fun either.
My Top Performing Story
My top performing story is, somewhat ironically, a five part series called "Reverse Engineering the Medium Earnings Model", where I basically learned that it is impossible to really understand how the Medium earnings model works. I put a ton of work into doing data-driven research for that one, and I earned a whopping $7. When I wrote it, I figured it was a sure path to viral success because every Medium writer wants to succeed and this article really goes deep, and there are a ton of Medium writers out there.
I was wrong.
Why Host Your Own Blog
When you host your own blog, or website, it's truly yours. You get your own place in the sun (i.e., domain name). You don't depend on a third party for anything. The impressions are yours to find, and your success only depends on you. Adding Google Analytics is free and easy - just drop a link on each page - and you'll know everything there is to know about your audience. If you are lucky enough to find your viewers, you can choose to monetize your blog using ads and affiliate marketing. Or not. Maybe just write.
And, you can do both - write on Medium and also publish your stories on your blog. You can go with a fancy website builder like Wordpress or Squarespace, but those are not cheap. You'll have some creative control, and you can get your own domain (even more money), but honestly, why swim with the tide if you can swim against it? It's more interesting and you'll learn something. Rolling your own is cheap and relatively easy - I did it in an afternoon. I'll tell you how to do it in this article. And you don't need to be a techie - no coding is required. Though, I will warn you, there will be some frustration along the way. But, in the end you'll get there.
You can make it fancy, or not - mine is utilitarian by design - check it out here.
How to Host Your Own Blog
I'm not going to present every detail - just give you a roadmap to get you started and let you know what's required before you dive in. You can get all the details for each step using ChatGPT. There are a couple of tricky things that might trip you up, so I'll give you some tips about those.
Step 1: Sign on to AWS
Super easy. Get a free account and sign in here.
Step 2: Get a domain name
Once you're into AWS, you can use their Route 53 tool to get a domain name. Costs about $10 per year.
Step 3: Get an SSL certificate
An SSL certificate is what lets your blog serve from "https://mydomain.com" instead of "http://mydomain.com". Honestly, for a simple blog site you probably don't need this - and it's the certificate that costs $0.50 per month. But, folks expect this and it gives your site some legitimacy. So I recommend going for it.
Step 4: Create an S3 Bucket
S3 is where you store the html files for your blog. Create a bucket and give it the same name as your domain name. Create a simple "hello world" html file, name it "index.html", and upload it to your bucket. We'll need this file to know we've set everything up properly. On the Permissions tab, take note of the "Bucket Policy" which is blank - we'll have to come back to that after the next step.
Step 5: Create a Cloudfront Distribution
Cloudfront is the application that basically connects your S3 bucket, and its files, to your domain name. 'Nuf said. This is the trickiest part. Make sure you:
- Set your default root object to "index.html"
- Set your alternate domain name to "mysite.com"
- Attach your SSL certificate
- Go to the "Behaviors" tab and configure it like this:

Create an Origin Access Control Policy
Do this on the origins tab. Here's mine. When you click "Copy Policy" it will give you the json to copy into your Bucket Policy noted in Step 4.

Bonus Tip
I wish Amazon made this part easier, but they didn't. If you only have .html files in your S3 bucket, and you don't mind having URL paths to your blog posts that look like "https://myblog.com/my-first-post.html", then you can skip this step. On the other hand, if you want to store each blog post in its own bucket on S3 (e.g., keep your images for each blog post separate from the others), and have blog posts with URLs like "https://myblog.com/my-first-post" (no trailing .html extension) then you need this step.
Step 5.1 - Create a function to add a trailing slash to each request coming in.
Here's mine:
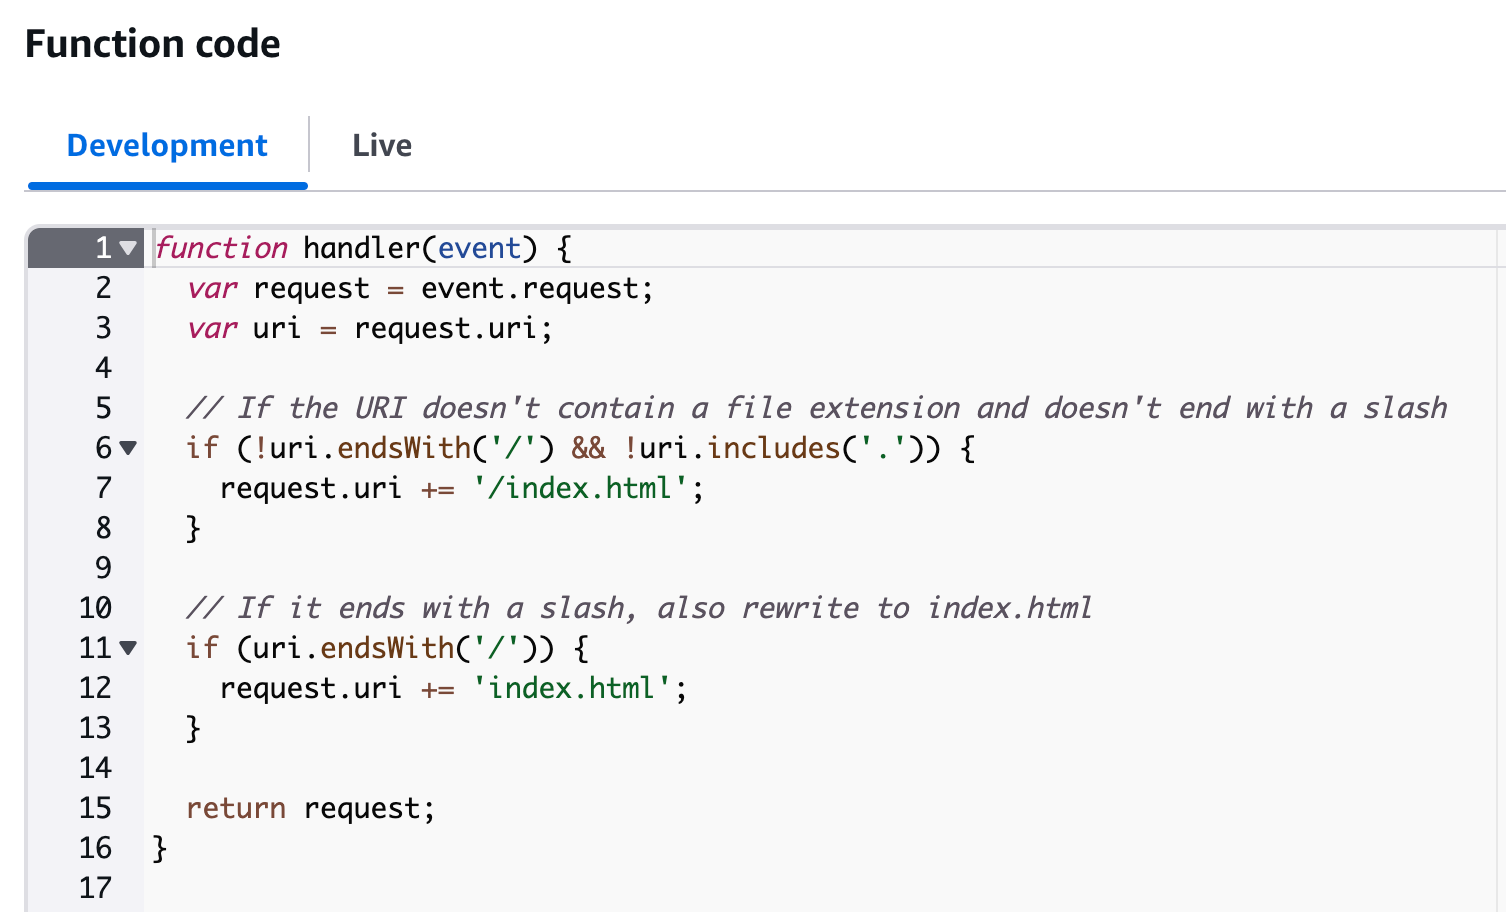
Yep, ChatGPT wrote that.
Step 5.2 - Attach that function to the Cloudfront behavior named "/*". Here's what it looks like:

Yeah, that step was a bit painful. And I said "no code" yet there it is. Does it count if ChatGPT writes it?
Step 6: Connect Your Cloudfront Distribution to Your Domain Name
This is the step that ties it altogether. Using Route 53, go to "Hosted Zones", select your domain name, and add an "A" record to connect your domain name to your cloudfront distribution.
At this point, after some time for things on the AWS side to settle in (literally, but the details will bore you), you should be able to navigate to your https://myblog.com site and see your "hello world" file.
Step 7: Create Your Static Website With Your Blog Posts
Finally - the fun part. I wish Amazon made the first part easier, but for $0.50/month I guess it's worth a few headaches.
There are lots of ways to go here, and this is the fun/creative part. Ultimately, you need to turn your blog posts into html files, and upload them to your S3 bucket. There are lots of static site generators that will create a site from markdown files, which is the way I went.
Ask ChatGPT for some tools to do this, and you'll get a list of some nice, free ones. I had ChatGPT (well, Cursor really, same thing) to build me a command line tool. And it did. Works great, nothing fancy. Once you've got your files, just upload them and away you go.
Step 8: All the Other Stuff
Now that you're off and running, expect more crickets. You've got to set up a Google Analytics account to get analytics on your traffic (the stuff Medium doesn't provide), register your site with the search engines, and so on. It is a bit of a pain, but you will learn a lot. ChatGPT will be your friend.
Congratulations, If You Made it this Far
Granted, all this isn't as simple as I'd like it to be, or as simple as AWS could make it, if they wanted to. Probably just not enough customers to make it worthwhile for them. But, even if you're not a techie I do think this is manageable, especially with ChatGPT at your side. Good luck!